

This article was written by The Zillennial Zine’s fall editorial intern Elizabeth Miller. Find them on Instagram at @Lizzy_7979. If you would like to share an article with The Zillennial, send us an email at thezillennialzine@gmail.com.
As someone always looking for new crafting projects, I love finding small projects that can help me develop my crafting skills in bite-sized chunks. The beauty of small projects is that I can work on my skills without losing motivation because the project feels too big, and I can get the serotonin boost of finishing something. Knitting, crocheting, and sewing are more of my expertise, but I do know a little bit about embroidery. As a relatively inexperienced hand embroiderer, I have come across the cutest trend that I think is perfect for new embroiderers.
The trend I’m talking about is stitching embroidery on sleeve cuffs! This makes me want to customize all of my sweatshirts. Crafters have been embroidering little bunches of flowers, quotes, and other cute and personal touches about an inch above the wrist cuff of sweatshirts. If you have a sweatshirt you’d like to elevate, read on for a how-to and some inspiration!
Beginner Tips
If you are a beginner to embroidery, there are a few stitches you will need to learn how to do first. Backstitching is great for lines and outlines. If you don’t like the slight gap between the stitches, you could do a split stitch or make the line a bit bolder by wrapping the thread through the stitches in the stem stitch. Satin stitching fills in areas with color. Just be mindful that the threads are harder to align the longer the distance of each stitch is.
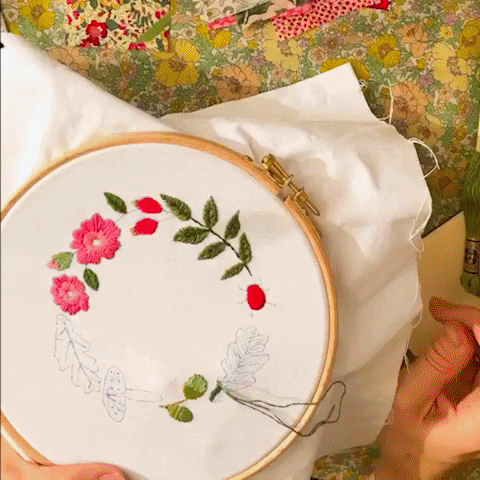
If you’re struggling to come up with your own designs or want to practice with your shapes, I recommend getting dissolvable stick-on embroidery patterns. The design is printed onto a water-soluble sticker, and when you’re ready to use it, it sticks to the fabric. Once you finish embroidering the design, simply run it under water for a few minutes and the sticker will disappear! How clever! There are so many cute designs, just make sure to check the size before purchasing.
One last thing I want to note is that this project is just a little bit different compared to usual embroidery projects. Sweatshirt fabric is a bit stretchy, so when you fit it into an embroidery hoop, it will not get as taught as nonstretch fabrics. Just be mindful not to stretch the fabric too harshly because it could damage the sweatshirt, or the stitches may become distorted when the hoop is removed.
Getting Started and Materials
The first step of this project is to figure out your design. You can pick out a premade design, or draw with a washable fabric pen or friction erasable pen on the fabric. If you use an erasable pen, you can use an iron to get rid of the lines.
Once you have your design picked out, select the colors of floss you need, get a small embroidery hoop, and gather your needles.
Center the design about an inch to an inch and a half above the cuff of the wrist facing out. If you are using a sticker design, it may be best to put the hoop on first before sticking the sticker. When affixing the hoop, put one ring inside the sleeve so that you stitch only through one layer of fabric, otherwise the sleeve will get sewn shut. Once you have everything set up, you can embroider as normal!
Inspiration
When I say that I want to do this to all of my sweatshirts, I mean it! For my more plain sweatshirts, I really like the flower bundle ideas. I recently got a sweatshirt at a concert of one of my favorite bands, and I might embroider the names of my favorite songs at the cuff. There are also a lot of very cute fall-themed designs coming out for the season! When it comes to this cute trend, the options are endless!
How are you going to put your own spin on the embroidery on sleeve cuff project? Let us know in the comments!


Leave a Reply